
Crochet a Cozy Lap Blanket with Icelandic Wool for Ultimate Warmth
- Anna Jonsdottir
- Oct 13, 2025
- 6 min read
Are you looking for a project that combines creativity, warmth, and practicality?
Crocheting a lap blanket offers just that!
Using Icelandic wool elevates your creation to a new level, thanks to its remarkable warmth, durability, and appealing texture. In this guide, I'll showcase the unique benefits of Icelandic wool, provide an easy pattern for a snug lap blanket, and share tips to enhance your crocheting journey, making it enjoyable and stress-free.

Why Choose Icelandic Wool?
Icelandic wool stands out because it originates from a special breed of sheep native to Iceland. These sheep have adapted to the harsh Icelandic landscape, producing a wool that offers unparalleled warmth and water resistance.

Key Features of Icelandic Wool:
Two-layer Structure: A long, water-resistant outer fiber (tog) that repels water and a soft, insulating inner fiber (Þel) that traps warmth. This unique combination makes the Icelandic Wool, lopi that is warm, lightweight, breathable and durable which makes this wool an ideal choice for cozy projects like lap blanket.
Colors: You can find Icelandic wool in a variety of natural shades, from soft grey to earthy browns, allowing for stunning crochet and knitting designs. The white wool of the Icelandic sheep is also dyed in yummy colors using sustainable and eco-friendly methods.
Locally made by Istex: The main manufacture of Icelandic Wool is Istex, which was established in 1896 in a city next to Reykjavik, Mosfellsbaer. The Icelandic farmers own more than 80% of the company and the wool is certified STANDARD 100 by OEKO-TEX.
Materials Needed for the lap blanket
Before you embark on your crocheting adventure, make sure you have the following materials on hand:
Icelandic wool yarn: Gather approximately 1000 grams of Lettlopi. This estimate depends on the size you prefer for your blanket. My lap blanket is 41"x66", just the right size when cozying up with a book by the fire.
Crochet hook: Use a 6 mm hook to achieve a loose stitch.
Scissors: For cutting threads. There are a few!
Tapestry needle: Essential for weaving in loose threads and assembling the blanket.
Equipping yourself with the right materials will lead to a smoother and more enjoyable crocheting experience.
Basic Crochet Stitches
If you are new to crocheting, familiarizing yourself with fundamental stitches is crucial. The main stitches used in this lap blankets include:

If you're new to crocheting, numerous really great online resources are readily available. I prefer picture tutorials, but choose any video or picture tutorials that provide step-by-step guidance for mastering these fundamental stitches.
A Lap Blanket Pattern with hexagons
Here’s a straightforward pattern to create a cozy lap blanket using Icelandic wool:
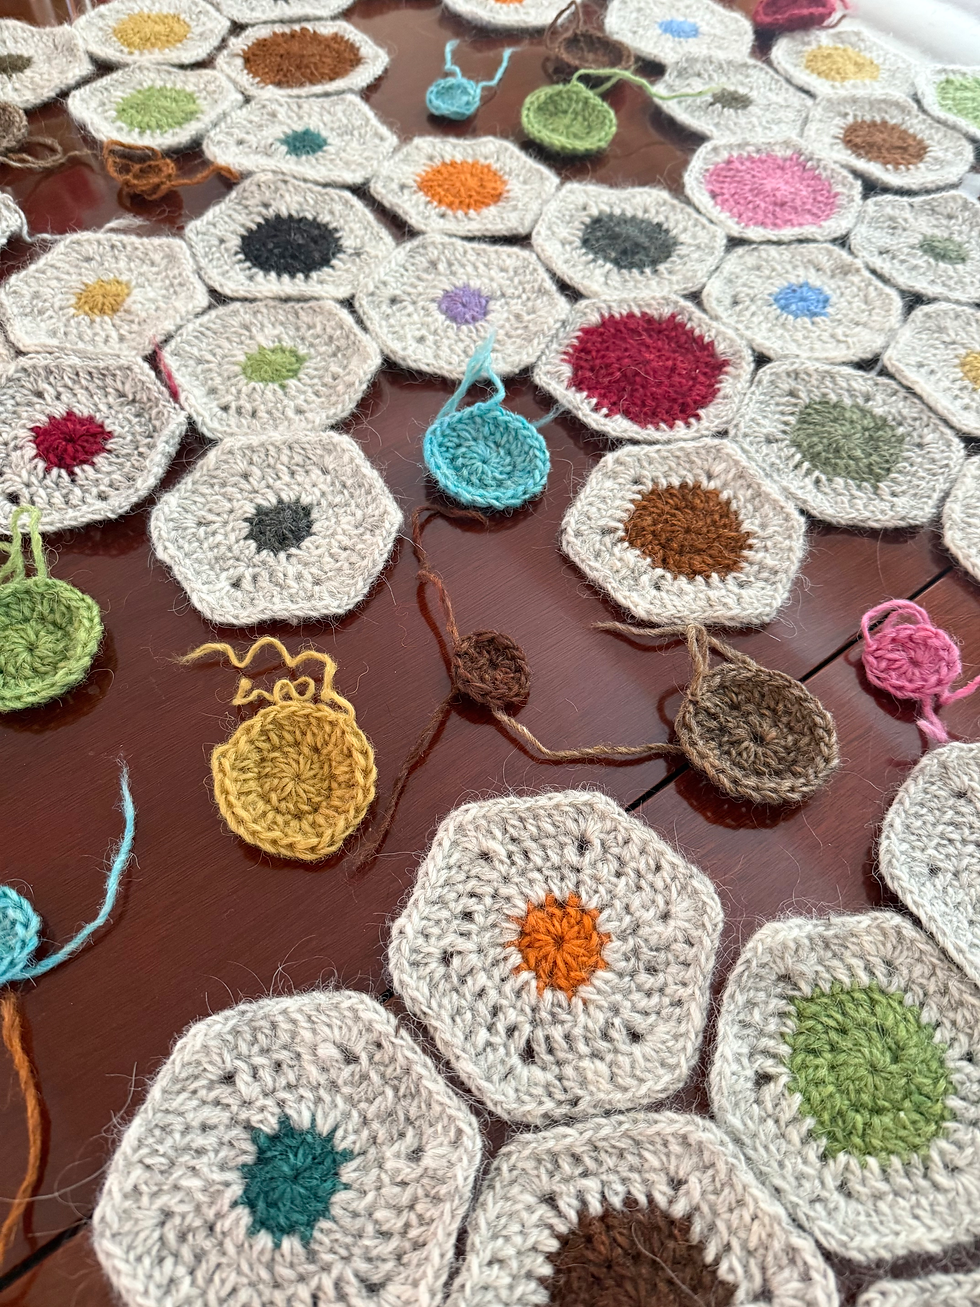
Step 1: Create hexagons, total of 144 + 18 half hexagons


For this lap blanket I used Lettlopi from left over projects, total of 14 different colors and light grey. It's made out of 144 hexagons
69 hexagons with rnd1 in colored yarn
65 hexagons with rnd1/rnd2 in colored yarn
10 hexagons with rnd1/rnd2/rnd3 in colored yarn
I then crochet 18 half hexagons to make the side of the blanket straight. I basically just took the pattern and halved the pattern and made a half hexagon. Forgot to take a photo, but hopefully you get my thinking.
Step 2: Sew the hexagon together
Now comes the fun part, designing the blanket and sewing the hexagons together. There are many ways to accomplish this, but I used a needle and went into the back loop of each hexagon, sewing the sides together and going around each hexagon linking it to the next hexagon making a solid surface.


Basically you insert the needle into the back loop of two hexagons making sure they line up. Then you follow it around and sew the next one to it.
Step 3: Crochet a boarder on the top and bottom of the blanket
To make the blanket with straight border I crochet the following. On top of each hexagon I started with a sl st, then sc, half dc, dc, triple dc, then towards the center, where the hexagons joined I made 5 triple crochets that I crocheted together before I reversed the order of my stitching to fill in the space between the hexagons at the top and bottom of the blanket.

Step 4: Crochet a boarder around the blanket
I started with 1 row of dc into every stitch around the blanket to make it easier to make a smooth boarder. Then I stitched into every other stitch 1 dc with 1 ch between. In the next row I crocheted 1 dc into the chain stitch and 3 dc into each corner. This gave me a straight boarder and a finished look. As you can see on the picture below, I alternated light and colorful rows and used up nearly all my leftover yarn I had in my stash.

This was so much fun. Love this boarder as it's made with nearly every color that I hadn't already finished while making the hexagons. What a relief that I finally found a project to finish of all those left over skeins from various lopapeysu that I have knitted for my family through the years. All in all the boarder ended with 10 rounds of alternating light colors rows and bright colors rows, finishing of the blanket with back boarder.
It just needed a black row to finish of this lovely blanket, and the best part is that I used up around 1 kg of left over skeins of lettlopi in various colors that I had in my stash.
Helpful Tips for Working with Icelandic Wool
Gauge Swatch: Before starting your blanket it's advised to make a gauge swatch, but I didn't. Just make sure you always use the same size and make of needle. This will ensure your stitches match the required size, leading to uniform dimensions for your blanket.
Care Instructions: While Icelandic wool is naturally water-resistant, it is important to hand wash your blanket in cold water and lay it flat to dry. Avoid the washing machine, as it can lead to felting.
Explore Color Combinations: Do not hesitate to experiment with different colors of Icelandic wool. Try creating stripes, blocks, or even gradient effects for a look that's uniquely yours.
Comfort is Key: Crocheting can be a lengthy but fun process. Make yourself comfortable in a supportive chair, take breaks, and keep a cozy blanket nearby for extra warmth as you work. Hexagons can be made anywhere, it´s only when you start constructing the blanket that it needs to lay flat!

Wrapping It Up
Creating a lap blanket from Icelandic wool is a fulfilling project that not only keeps you warm but also acts as a functional piece for your home. Thanks to the unique properties of Icelandic wool, your blanket will remain cozy and durable for years.
Whether you are an experienced crocheter or just starting, this project is accessible and enjoyable. So gather your materials, find your favorite spot, and start crafting your very own cozy lap blanket. Mix up the colors, mix up the size of the colored center in each center. Find all your leftover lopi yarn and just start. You can't go wrong. Own your creativity, Own your design and have fun.
Happy crocheting!


de88 dạo này thấy nhiều người nhắc nên mình cũng ghé thử cho biết, kiểu vào xem giao diện với cách họ trình bày thôi. Mình để ý cái thanh menu chính chia nhóm khá gọn, nhìn lướt là biết nên bấm chỗ nào chứ không bị ngợp. Lúc mở trên điện thoại thì thao tác cũng ổn, cuộn trang và chuyển mục thấy mượt, không kiểu giật giật hay loạn nút. Với lại mình thích mấy đoạn ghi chú họ đặt khá dễ thấy, nhắc người dùng tự kiểm tra điều khoản trước khi làm gì liên quan giao dịch, đọc qua thấy yên tâm hơn chút. Nói chung mình chỉ xem sơ sơ, nhưng cách họ phân khối…
https://uy88.events/ hôm trước mình lướt web thấy ai đó nhắc nên tò mò bấm vào coi thử thôi. Mình không đăng ký hay tìm hiểu sâu, chỉ xem cách họ sắp xếp nội dung cho người mới có dễ nắm không. Cảm giác đầu tiên là trang nhìn khá sáng và thoáng, đọc lướt không bị rối mắt. Trong phần giới thiệu mình có thấy họ nhắc giấy phép Costa Rica & PAGCOR ngay trong nội dung, kiểu đưa thông tin vừa đủ chứ không dài dòng. Mấy đoạn text được chia khối rõ ràng nên kéo xuống là biết mình đang ở phần nào, không phải đoán. Nói chung mình thích kiểu trình bày này vì nhìn một lượt…
https://xosoplus.mobi/ mình ghé thử vì thấy mọi người nói nhiều, kiểu vào xem giao diện họ làm ra sao thôi. Lướt một vòng thấy họ chia mục khá dễ hiểu, nhất là phần XSMB theo ngày nhìn phát biết mình đang ở trang nào, không bị lạc. Mình thích cái đoạn bảng “Đầu Lô tô / Đuôi Lô tô” vì để dạng cột gọn gàng, nhìn nhanh là nắm được số liệu chứ không phải căng mắt đọc. Cuộn xuống cũng không bị ngợp, tiêu đề với khối nội dung tách ra rõ nên xem trên điện thoại vẫn ổn. Nói chung cảm giác là họ ưu tiên cho người xem lướt nhanh, và cái bảng Đầu Lô tô/Đuôi Lô…
sc88 hôm bữa mình thấy bạn bè nói nhiều nên ghé vào coi thử cho biết thôi. Mình không đăng ký hay chơi gì, chỉ lướt qua xem họ làm trang ra sao. Cảm giác đầu tiên là load khá nhanh, bấm qua vài mục vẫn mượt, không kiểu đứng hình khó chịu. Giao diện nhìn đơn giản, chia khu rõ ràng nên người mới vào chắc cũng không bị rối, chữ với khung nội dung đặt gọn gàng. Mình để ý họ tối ưu tốt cho điện thoại nữa, kéo lên kéo xuống vẫn dễ đọc, không bị vỡ bố cục. Với lại phần nội dung được gom theo từng nhóm, nhìn phát là biết mình đang ở khu…
75bd website popped up for me while I was scrolling through a thread about entertainment sites, so I clicked mostly out of curiosity to see how it’s set up. I didn’t dive deep into the actual content, but the page felt easy to read right away. The top menu is right there where you expect it, so you’re not guessing where to go next. What I noticed most is how everything’s broken into clear blocks, and the info sits in those neat column table-style sections that make it simple to scan fast. Nothing feels jammed together, and flipping between pages didn’t feel clunky or slow. The clean category blocks and tidy columns are the main things that stood out in…